June 28, 2013

12 Reaper tips and tricks you need to know


12 Reaper tips and tricks you need to know


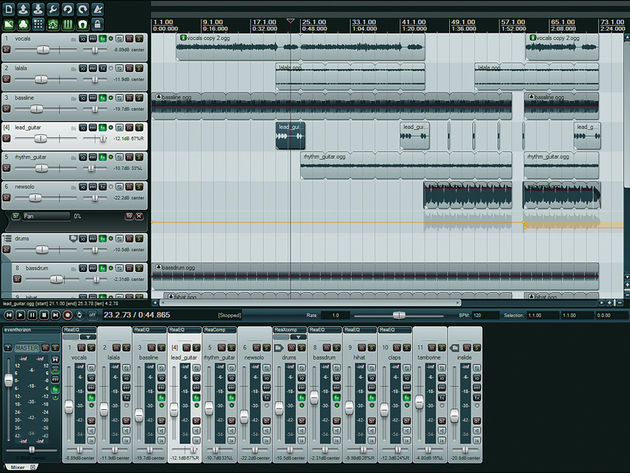
MusicRadar users dig Reaper - in fact, you recently voted it your favourite DAW. This cross-platform application has a tiny installer (just 8MB, in fact), yet boasts powerful features that put it on a par with many of its more expensive rivals. What's more, those who've been frustrated by other DAWs frequently report that it's easier to use.
If you're just getting acquainted with the software - or you're considering trying it for the first time - here are 12 things to bear in mind…


1. Pitch up

If you're stuck with a dodgy vocal take, don't panic - you might be able to get away without re-recording it. Reaper includes a handy little plug-in called ReaTune, which works in a similar way to Antares Auto-Tune. Simply set the correction mode to a scale and key, and the plug-in will do the rest. Alternatively, the manual correction mode can be used for more in-depth pitch manipulation.


2. System overload

When using lots of plug-in instruments and effects, you may find yourself running out of CPU power. Thankfully, Reaper's Performance Meter window offers the most advanced performance analysis we've seen, showing you exactly which tracks are consuming the most power. It can be accessed from the View window.


Reaper tips


3. Chained up

One cool way to streamline your workflow is to save commonly-used combinations of instruments or effects as FX chains. To do this, right-click the FX window and select Save FX Chain. These can then be added to any track by right-clicking it and selecting Add FX Chain.


4. In a jam

Stuck for inspiration? Reaper includes a great tool for online collaboration in the shape of ReaNINJAM. This plug-in enables users to jam together over the internet. For more details, head to the NINJAM website, where you can access the NINJAM community forum.


Reaper tips


5. Window of opportunity

These days, many DAWs eschew multiple floating windows and instead opt for a single-window approach. Reaper gives you the best of both worlds: by default, the MIDI grid editor, performance meter and so forth all open in new windows. However, they can also be docked at the bottom of the screen by right-clicking them and selecting the Dock option.


6. Double take

Need to beef up a track in a hurry? Give Reaper's Tracks»Duplicate Selected Tracks function a whirl. This creates identical copies of any and all selected tracks, making it perfect for doubling MIDI lines, or for performing parallel processing on audio parts.


7. Curve Ball

Reaper offers a variety of different automation curves. To select a curve type, right-click an automation point and pick Select Shape For All Selected Points from the menu. You'll be presented with a choice of several well thought-out curve types, which can help make getting that perfect sweep or fade that little bit easier.


8. Locking up

With complex projects, it's easy to get confused and edit items you might not mean to. In order to avoid this, check out Reaper's lock function. Open the Appearance»Media section of the Preferences menu and ensure that both Locked and Unlocked in the Media Item Icons panel are selected. All media items will now display a lock icon that enables you to fix their position.


9. Causing ripples

Another useful feature when working with complex or longer projects is Reaper's ripple mode. This is activated by pressing Alt+P, or via the Options»Ripple Editing menu entry. With ripple edit mode activated, any audio object you move on any given track will also move everything else on that line.


10. Taking a sample

One of Reaper's best-kept secrets is the ludicrously-named ReaSamplOmatic 5000 instrument. A basic sampler, it's nothing particularly out of the ordinary, but its modest CPU usage requirements and straightforward interface make it worth checking out. It can only load a single sample, but you can use multiple instances for multisampled patches and drum kits.


Reaper tips


11. Power trip

If you're struggling to keep those CPU cycles down, consider using Reaper's clever Render Selected Tracks To Stem Tracks (And Mute Originals) function, in the Track menu. This quickly creates a bounced version of each track, including any effects processing. With the original tracks automatically muted, your CPU is freed up for other tasks.


12. Cash register

If you continue to use Reaper after the 30-day evaluation period, you really should register it. Not only will this help fund development of the DAW and give you a nice, warm feeling inside, but once you've done it, you won't have to wait for the irritating countdown timer each time you launch it.

For a complete guide to using Reaper, check out the May issue of Computer Music (CM151) which is on sale now.Source: http://www.musicradar.com/tuition/tech/12-reaper-tips-and-tricks-you-need-to-know-250130

June 7, 2013

How to record guitar using your iPhone/iPad

Although I'm in the Android camp, you have to give Apple credit for putting a polished product like Garage Band into the iPhone/iPad market. Enjoy.

How to Record Guitar Using Your iPhone/iPad

Make Pro Recordings for as Little as $75

By , About.com Guide
Do you own an iPhone or iPad? Do you also play guitar? Did you know that for as little as $75, you can use your iPhone or iPad to make professional-quality recordings of your guitar playing, complete with effects, keyboard and drum tracks? The following feature outlines the tools you'll need to make recording your guitar playing on your Apple device a snap.

iPhone/iPad Recording Gear Cheat Sheet

Here is a quick overview of the tools you need to begin recording on your iPhone. More information on each product is available below.
  • iPhone 4/4s:

    • Electric instruments only - Apogee Jam Guitar Interface, Garage Band (app)
    • Electric/Acoustic/Vocals - Apogee Jam Guitar Interface, Blue Mikey, Garage Band (app)
  • iPhone 5 (and even newer models):

    • Electric instruments only - Apogee Jam Guitar Interface, Lightning to 30-Pin Adapter, Garage Band (app)
    • Electric/Acoustic/Vocals - Apogee Jam Guitar Interface, Blue Mikey, Garage Band (app)
  • iPad (1st generation, iPad2, 3rd generation)

    • Electric instruments only - Apple Camera Connection Kit, Behringer Guitar Link UCG102 USB Interface, Garage Band (app)
    • Electric/Acoustic/Vocals - Apple Camera Connection Kit, Behringer Guitar Link UCG102 USB Interface, Blue USB Microphone, Garage Band (app)
  • iPad (4th generation, iPad Mini, and even newer models)

    • Electric instruments only - Apple Camera Connection Kit, Behringer Guitar Link UCG102 USB Interface, Lightning to 30-Pin Adapter, Garage Band (app)
    • Electric/Acoustic/Vocals - Apple Camera Connection Kit, Behringer Guitar Link UCG102 USB Interface, Blue USB Microphone, Lightning to 30-Pin Adapter, Garage Band (app)

Hardware/Software for Recording Guitar on your iPhone/iPad:

Apple Camera Connection Kit (iPad users only)

apple ipad camera connection kit
Plugging this simple little Apple connector into your iPad (the unit does not work with iPhones) provides you with a USB input, into which you can plug a myriad of different devices. Some of these (microphones with USB out, guitar inputs) are listed here, but there are hundreds of others available. My daughter's electric keyboard, for example, can interface with the iPad using this kit. Note that although the Camera Connection Kit (often referred to as CCK) does work on iPads with lightning connectors, you'll need to have a "Lightning to 30-Pin Adapter".

Behringer Guitar Link UCG102 USB Interface (iPad users)

Behringer UCG102
Requires the Apple Camera Connection Kit. A simple little device that converts your analog electric guitar signal to USB, which can then be plugged into your iPad. Just run your standard 1/4" guitar cable directly from your instrument into the UCG102, and you can plug that into your iPad (via the Camera Connection Kit). The device features a high/low gain switch and a clip warning light.

Blue USB Microphone (iPad users only)

Blue Microphone
Requires the Apple Camera Connection Kit. I love this odd-looking and relatively inexpensive little microphone for quickly and easily recording acoustic instruments. You simply plug a USB cable from the microphone into your iPad (via the CCK) and you are ready to record. I've used the Blue for recording acoustic guitar, full bands, spoken audio, and some lead vocals, and have been impressed with the capture quality. A three-stop setting on the microphone allows you to control gain.

Apogee Jam Guitar Interface (iPhone/iPad users)

apogee jam
The first generations of devices designed to allow you to record electric guitars through your iPhone shared a common flaw - they used the analog audio-in via the phone's headphone jack. This resulted in low-quality recordings plagued by "crosstalk" and other technical issues. The tiny Apogee Jam, although slightly more expensive than some of these cheaper options, uses the iPhone/iPad's 30-pin dock connector for a much higher quality data transfer. In simple terms, this allows for a much higher quality recording. With the Apogee Jam, you can plug your electric instrument in to one end of the unit via a standard connect 1/4" cable, and into the other end plug your iPhone/iPad, using the provided 30-pin connector (if you have an iPhone/iPad you'll need the Lightning to 30-Pin Adapter). And, as simple as that, you're rigged to record on your iPhone.

Blue Mikey (iPhone)

blue mikey
Full disclosure - I haven't tried the Blue Mikey. But the microphone does look promising - it interacts with the iPhone's 30-pin digital port, rather than the inferior analog audio-in accessible through the iPhone's headphone jack (which is what allows Apple to include a microphone in their headphones). Using this microhpone, you'll be able to record any analog sound on your iPhone - acoustic guitars or other instruments, vocals, etc. Note that iPhone owners with lightning connectors will need to own one of Apple's "Lightning to 30-Pin Adapters".

Lightning to 30-Pin Adapter (iPhone 5/iPad 4th generation/iPad mini users)

Apple Lightning to 30 pin adapter
If you have a newer iPad or iPhone with a "lightning" connector instead of the older 30-pin connectors, you'll need this adapter to interface with many of the items listed here.

App: GarageBand (iPhone/iPad users)

Once only available for desktops, Apple's GarageBand is now available for the iPhone and iPad. The functionality they've packed into this low-priced app is truly impressive - for $5 you get multi-track recording, effects pedals, "smart" drum and keyboard tracks, and much more.

App: Audiobus (iPhone/iPad users)

Although not an essential purchase for those just getting their feet wet in recording on their iDevice, Audiobus is a handy tool that allows different audio apps to interact with each other... for example allowing you to record the guitar sound you've dialed in via the AmpliTube app using the GarageBand app.

App: Guitar Tuner (iPhone/iPad users)

Here is a straightforward, free app that allows guitarists to tune their instruments via their iPhone. Pretty handy stuff.

Source: http://guitar.about.com/od/recording/tp/How-To-Record-Guitar-Using-Your-Iphone-ipad.htm?nl=1

Home Recording on a Budget

Home Recording on a Budget

Getting big sound on a limited budget

From , former About.com Guide
Home Recording on a Budget
Recording on a Budget
Pro Tools photo courtesy Digidesign
It's seriously never been cheaper to start your own home recording studio. Having a limited budget for your home studio doesn't have to mean inferior recordings! In fact, believe it or not, there's some really amazing recordings that were made on a strict budget and without the "latest and greatest" in recording technology.

Simple is sometimes better

Before agonizing over not being able to afford the latest multitrack recording or highest-input Pro Tools system, consider this: some of music's most amazing recordings were made on systems with limited options.

Consider one recording that I use when teaching multi-track recording: Marvin Gaye's epic hit, "Ain't No Mountain High Enough". This recording was made in a recording studio on only a four-track recorder; in total, four tracks were recorded to make this epic song, and it was good instruments, good microphones, and even better musicians that came together to make this recording -- no Pro Tools editing, no Auto Tune, and no 24-bit sampling.

My point is this: if you're confident about what you're recording, and you've got great chops on your instrument, it doesn't matter how you record; you'll still have a product you'll be happy with. And if you take some time to put together the perfect recording rig for your budget, you can offer the best representation of your talents, even with limited spending.

Select your space

First, start by reading the tutorial about setting up your studio space for recording. After you've got your room selected, it's time to stock your studio.

Choose your medium

The first thing to figure out when setting up your home studio is what you wish to record to.

Do you plan on recording with a computer, or with a stand-alone recording device like a digital multitrack? Each way has it's advantages and disadvantages; however, the most bang-for-the-buck today is computer recording, especially if your computer was made anytime in the last few years.

If you aren't computer-savvy, consider a product like the Fostex MR-16HD ($399), an all-in-one digital recorder capable of recording four tracks simultaneously, and mixing up to sixteen tracks per session.

If you're going for a computer-based interface, the options are limitless. The most popular interfaces are FireWire interfaces by manufacturers like M-Audio and Presonus. The things to look for when selecting an interface are pretty basic: at least two microphone inputs with preamps (which allow you to plug in high-quality microphones and use them without a mixer), speaker and headphone outputs, and of course, compatibility with your current system. From there, choose whichever software you wish to use.

Pro Tools vs. everything else

Digidesign's Pro Tools software suite is the standard of almost every major commercial and project studio in the world, and with good reason. Pro Tools is highly stable, offers limitless expansion, and the industry-standard compatibility means you can start a project in your home studio and quickly take it to almost any studio in the world for completion.

For most of the tutorials here, I'll be referencing Pro Tools because of its widespread use. Pro Tools comes in three versions: M-Powered, for use with lower-cost M-Audio interfaces; LE, which is designed for use with the MBox and Digi 003 products; and HD, which is meant for use with higher-end systems.

When using Pro Tools, it's necessary to work with a compatible interface. Pro Tools M-Powered is a fantastic version of Pro Tools that's designed to work with many of M-Audio's less expensive interfaces; the software alone will run you close to $250, but it's well worth it. You can use M-Powered Pro Tools with interfaces such as the M-Audio Fast Track Pro ($349).

Pro Tools LE requires the purchase of either the Digidesign MBox 2 ($450 new, less if purchased used) or the Digi 003 ($2195)/Digi 003-Rack ($1369).

The only exception is Pro Tools Free, a version limited to 8 tracks with limited capabilities; however, it'll work with an on-board sound card and doesn't require a specialized interface.

Other software options

If you choose not to go the Pro Tools route, there are many additional options you can consider, well within any budget.

Apple's built-in GarageBand software is fully capable of multitrack recording, although the mixdown options are somewhat limited. If you have a recent Mac with OS X, GarageBand is many times included for free.

Apple's Logic software is quickly gaining a reputation for great quality multitrack work as well. Other software packages include Cakewalk and Cubase. One thing to remember is that it's very easy to over-buy when getting started. Stick to something that's intuitive when you're just starting out and that will have the ability to expand as you do over time.

The other gear

Once you've selected your interface and software, it's time to procure the other things you'll need. How "fancy" your equipment is depends on your budget and needs. At the very least, you need a microphone and monitoring speakers.

Which microphone you select, again, depends on your needs and what interface you're using. If you're not using an external interface which includes a microphone connection, you'll want a microphone that's either self-powered or USB powered. Mics like the Samson C01U ($299) simply plug in to your USB port.

A good starter microphone like the Audio-Technica AT2020 ($99) or the Shure SM57 ($99). Both are perfect for instruments and vocals. From there, it's up to you what you want and what you can afford. Check out this link for more great microphones for under $200 each.

Monitoring speakers serve a very important purpose: allowing you to hear well and mix your project to the very best. Choose something within your budget that sounds the best to your ears; your local music store should be able to help you audition the speakers in a controlled environment before purchase. From the Sony MDR-7506 monitor headphones ($99), M-Audio BX5a ($299/pair) to the JBL Nearfield Monitors ($2400/pair), there should be something that works perfectly for you in every price range.

For more must-have accessories for your home studio, check out Five Things Every Home Studio Needs.

June 6, 2013

How To Select an Audio Recording Interface

How To Select an Audio Recording Interface

From , former About.com Guide
MBox 2 Mini
MBox 2 Mini
Courtesy Avid, Inc.
The heart of any good home recording studio is your choice of audio interface. This piece of equipment handles input and output of audio from your computer; it's a lot more than just a sound card.

One of the best parts about selecting a recording interface is the fact that there's so many available, and they all offer stellar recording quality for the price. The downside? Selecting one from the many is hard! With this quick guide, we'll go down the list of questions you should ask yourself before buying an interface.
Difficulty: Easy
Time Required: 5 Minutes or Less

Here's How:

  1. Do you need Pro Tools compatibility? Digidesign's Pro Tools is the industry-wide standard, but being compatible, even on the smallest offering, comes with a premium price. Digidesign's cheapest Pro Tools HD offering, the MBox 2 Mini, rings up at $329, offering only a single microphone input and two line inputs. From there, you can move up to the Digi 003, at around $1600 for 8 channels.

    From there, remember: if you don't need Pro Tools and plan on using another software program, you don't need Pro Tools hardware, and don't need to pay the premium. Remember, too, you can use Pro Tools HD with any interface.
  2. How Many Inputs Do You Need? What type of music will you be recording? Do you need more than one input? More than two? Some interfaces that are cheaper offer less inputs. You want, at very least, two microphone preamp inputs - that way you can do vocals and, say, guitar at once. If you plan on recording drums, you'll need at least four preamp inputs for kick, snare, and stereo overheads. Chances are you'll want much more for good drum sounds. But don't overdo it - you can get by with less if you don't need it.
  3. Are You Using Garage Band? If you use Apple's Garageband, you can get by with the internal soundcard and a special adapter for instruments. Another great option is the new Samson USB microphones; it's very simple to plug-n-play. Garage Band is very powerful and versatile for beginners, and products like Samson's USB microphone make it unbelievably easy. For better quality, you can find something like Apogee's ONE ($249) if you only need a one-channel interface. And don't underestimate Apple's built-in quality, either. You can use adapter cables to record directly in if you're using a Mac and Garage Band.
  4. Firewire or USB? Firewire interfaces, as a rule, are more expensive than USB. If you're only doing one or two channels at a time, high speed USB is a must, otherwise you're limited to using a Firewire interface. Original slow USB cannot safely support the large amount of bi-directional data. Larger, more professional interfaces have dedicated internal cards to interface with the computer.

Tips:

  1. Remember, the most expensive interface isn't always the best for your needs. Most interfaces on the market today are "future proof", meaning that they go far beyond the current 16-bit standards into 24-bit recording. Don't be talked into buying more than you need, especially if you're just a hobbyist. Large chain stores like Guitar Center may not always have the most knowledgeable staff; they're just looking to make a quick commission. Don't feel like you're "cheaping out" if the best option for you isn't the most expensive.
  2. No matter your needs, always assume on the high end when it comes to inputs. You'll be surprised at how your needs seem to mysteriously expand somewhere between when your return policy ends and the first credit card bill arrives. It's better to have extra inputs if you can afford them. As you get better at recording, you'll be ready for more inputs as you tackle multiple instruments at once.
  3. Most places will accept a return after 30 days, so don't be afraid to go back to the drawing board if your needs aren't met. Find a salesperson you trust, and don't be afraid to ask for help in picking out an interface. Like we said before, go for retailers with the most experienced salespeople -- you want to buy from a fellow engineer, too.
  4. If you need to buy your software package separately, please, don't pirate your software. Aside from technical support, by not buying your recording software, you're doing a huge disservice to those who make their living by making your software.

What You Need

  • Determine Your Software
  • Choose Audio Interface
  • Microphone & Cabling
  • Computer