April 25, 2014
April 9, 2014
February 21, 2014
10 snazzy music production tools for Ubuntu/Linux
Like many other niches, music production was not really a Linux forte. But that's changing now and like what happened to the video editing scene,
popular music production tools are finding its way into Linux. Though I
love listening to all kinds of music, I'm no music production expert.
And hence I can't pass informative judgments on any of the applications
you're going to read about in the article below. Consider this blogpost
as a brief introduction to different music production tools available
for Ubuntu and Linux, and not as a review per se. So here we go again.
10 useful music production tools for Ubuntu and Linux.

Bitwig Studio Digital Audio Workstation
Bitwig Studio Digital Audio Workstation
- Bitwig Studio is a multi-platform (supports Windows, Mac and Linux) music-creation tool for production, performance and DJing.
- Bitwig Studio is made by developers that used to work on Ableton Live, a Windows only Digital Audio Workstation (DAW). And like Lightworks for video editing, Bitwig Studio will be a professional grade music production tool with support for Linux platform.
- Expected release date: March 26, 2014. Know more.
------------------------------------------------------------------------------------------------------------------------

Ardour: Audio mixing software for Linux
- Record, edit and mix audio using Ardour. Supports Linux and Mac.
- Ardour is open source and is released under GPLv2/GPLv3 license.
- Ardour is a great example of commercial free-libre software. Users who download from ardour.org are asked to pay at least $1 for downloading prebuilt binaries of Ardour; those users then have the right to obtain minor updates until the next major release.
- Another option is to subscribe by paying $1, $4 or $10 per month. Subscribers can download prebuilt binaries of all updates during the subscription period.
- Without paying anything, users can download the full source code for all platforms.
------------------------------------------------------------------------------------------------------------------------

Renoise Digital Audio Workstation
- Renoise is a Digital Audio Workstation (DAW) with a unique top-down approach to music composition known as a tracker interface.
- Features include full MIDI and MIDI sync support, VST 2.0 plugin support, ASIO multi I/O cards support, integrated sampler and sample editor, internal real-time DSP effects with unlimited number of effects per track, master and send tracks, full automation of all commands, hi-fi .WAV rendering (up to 32 bit 96 kHz), Rewire support, etc.
- A full version of Renoise cost USD 78.00, which is noticeably cheaper than competing digital audio workstations (DAWs) such as Ableton Live and even the upcoming Bitwig Studio which costs around USD 749 and USD 400 (rumored) respectively.
------------------------------------------------------------------------------------------------------------------------

Tracktion Music Production Software for Linux
------------------------------------------------------------------------------------------------------------------------- Tracktion is yet another high-profile entrant into the Linux music production scene.
- Tracktion is a digital audio workstation for recording and editing audio and MIDI. The project was started with the intention of creating the most easy-to-use music production tool out there. Tracktion is proprietary though.
- Support for a wide range of audio formats including WAV, AIFF and Ogg-Vorbis.
- Tracktion beta version for Linux is free now. Get it here.

Rosegarden Digital Audio Workstation (Linux exclusive)
- Rosegarden is an open source digital audio workstation for Linux, based around a MIDI sequencer that features a rich understanding of music notation and includes basic support for digital audio.
- Ideal for composers, musicians, and students working from a small studio or home recording environments. Quite easy to learn and runs exclusively on Linux.
- Download Rosegarden for Linux (an early alpha version for Windows is also available)
------------------------------------------------------------------------------------------------------------------------

Hydrogen: Advanced drum machine for Linux
------------------------------------------------------------------------------------------------------------------------
- Hydrogen is an advanced drum machine for Linux, an electronic musical instrument designed to imitate the sound of drums or similar percussion instruments.
- Hydrogen's interface uses Qt library and the entire code-base is released to the public under the GNU General Public License.
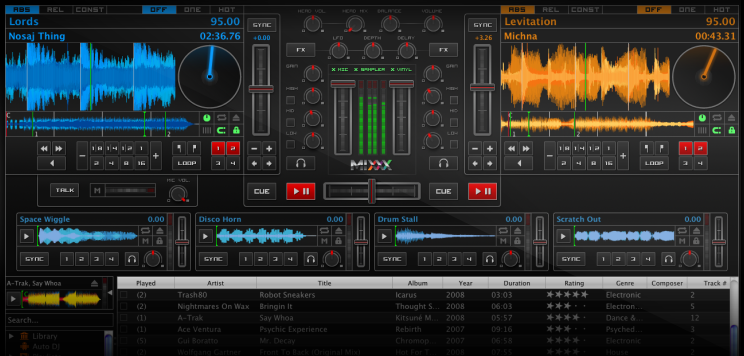
Mixxx: Linux's very own professional DJing software
- Mixxx is a free and open source digital DJing software that allows mixing music in your Linux system with ease.
- Mixxx started off as a humble project for a doctoral thesis way back in 2001. Today it is a full-fledged application that is downloaded over one million times annually.
- It is licensed under the GPL (v2.0 or later) and runs on all major desktop operating systems.
- More download options here.
------------------------------------------------------------------------------------------------------------------------

Audacity: Record and edit music in Linux with ease
- Audacity is the most well-known application here, and perhaps the most basic too.
- Audacity is a free and open source, cross-platform software for recording and editing all kinds of music and audio. It is one of the most downloaded software in SourceForge, with nearly 100 million downloads.
- If you are on Ubuntu, Click here to install Audacity.
- More download options for Audacity can be found here.
------------------------------------------------------------------------------------------------------------------------

LMMS: Linux MultiMedia Studio

JACK: Jack Audio Connection Kit
- LMMS is yet another free and open-source, cross-platform software that allows you to produce music with your computer. This include creating of melodies and beats, synthesizing and mixing of sounds and arranging samples.
- LMMS is available for Linux and Windows. Download here.
JACK: Jack Audio Connection Kit
- Jack Audio Connection Kit (JACK) is perhaps the most important tool as far as music production on Linux is concerned. It is a professional sound server daemon that provides real-time, low latency connections for both audio and MIDI data between applications that implement its API.
- It can connect a number of different applications to an audio device, as well as allowing them to share audio between themselves.
- Most of the open-source applications listed above and plenty more out there does use its API. See this exhaustive list for yourself.
- The server is free software, licensed under the GNU GPL, while the library is licensed under the more permissive GNU LGPL.
- Download options here.

December 1, 2013
Fender Champion Series Amplifiers
Fender updated the Frontman Series of solid state amps, and now offers the Champion Series. Below is the Champion 100, a better amp for less money than the old Frontman 212R. Nice job Fender.


Fender
Champion 100 Guitar Combo Amp - Black
Simple
to use and versatile enough for any style of guitar playing, there’s a Champion
amp that’s right for you whether you’re looking for your first practice amp or
affordable stage gear. The 100-watt, dual-channel Champion 100 features two 12”
Special Design speakers, with great amp voices and effects that make it easy to
dial up just the right sound—from jazz to country, blues to metal and more.
- Amplifier Type: Solid State
- Inputs: One 1/4"
- Channels: Two - (Blackface Clean and Selectable Amp Voice)
- Controls: Channel 1: Volume, Treble, Bass, FX Level, FX Select, TAP. Channel 2: Gain, Volume, Voice, Treble, Mid, Bass, FX Level, FX Select, TAP.
- Effects: Reverb, delay/echo, chorus, tremolo, Vibratone, and more. Delay time and tremolo speed can easily be set with the TAP button.
- Cover/Grille Cloth: Black "Bronco" Vinyl Covering with Silver Grille Cloth
- Effects Loop: Effects Loop (Preamp Out, Power Amp In) for Use with Outboard
- Speaker: Two 12" Special Design Speakers
- Aux Input: 1/8" Stereo for use with Media Player
- Headphone Jack: 1/8" Stereo
- Front Panel: Black Angled Control Panel
- Knobs: Black Vintage-Style Skirted
- Height: 19" (485 mm)
- Width: 26" (660 mm)
- Depth: 10.25" (260 mm)
- Weight: 40 lbs. (18 kg)
- Footswitch: Included 2-button footswitch (P/N: 0097298000)
- Other Features: World-renowned
Fender clean and overdrive tones, plus an assortment of British and modern
amp voicing and distortion flavors. Two channels (Channel One delivers
classic Fender clean tone based on amps like the Twin Reverb, and Channel
Two has selectable amp voicing). Powerful 100 watt output into two 12”
Special Design speakers. Auxiliary input for jamming with media player;
Headphone output for silent practice. Effects loop (Preamp Out, Power Amp
In) for use with outboard effects. Classic Fender Blackface cosmetics with
black angled control panel, skirted knobs, silver grille cloth, and black
“bronco” vinyl covering.

Source: http://www.fender.com/series/champion/champion-100-120v/

October 19, 2013
September 27, 2013
Gibson to acquire Cakewalk Recording Software company, Sonar X3 Announced
Guitar giant set to acquire Cakewalk Inc, and Sonar with it.
 Gibson logoPress Release:
Gibson Brands, the number one company in music and sound, has entered
into a letter of intent with Roland Corporation and Cakewalk, Inc. for
Gibson to acquire Cakewalk pursuant to definitive acquisition agreements
to be negotiated by the parties. According to Gibson Brands Chairman
and CEO Henry Juszkiewicz, “If imitation is the sincerest form of
flattery, Cakewalk must be very flattered that so many of their
innovations have become industry standards. As an addition to the Gibson
Pro Audio Group, Cakewalk will enhance their flagship professional
products, pursue provocative R&D initiatives, and continue to serve
the needs of musicians and producers world-wide.”
Following the closing of the proposed acquisition, a new brand, TASCAM Professional Software, will be created to support, promote, and publish Cakewalk’s current and future professional products. Cakewalk President Michael Hoover notes, “The world’s most iconic guitar, Gibson’s Les Paul, bears the name of the inventor of multitrack recording—and TASCAM launched a musical revolution by bringing multitrack recording to the masses. The combination will make a fitting home for products developed by Cakewalk.” TASCAM President Yuji Hanabusa states, “The future of recording is an intelligent, intuitive combination of both hardware and software. Cakewalk and TASCAM will have the power to realize this future.”
The Cakewalk staff and headquarters will remain in Boston as an independent division. Juszkiewicz concludes, “This isn’t just about wanting to acquire Cakewalk’s respected product line. We’re equally excited about what Cakewalk’s R&D labs are developing for current Cakewalk fans—as well as those who are about to become Cakewalk fans.”
www.cakewalk.com
 Cakewalk's new Sonar X3 family of productsThe
newest version of Cakewalk’s Windows-based DAW, Sonar X3, does away
with the Essential moniker for its lowest-priced product and endows its
most affordable Sonar release to date ($99) with the same tools and
track counts as its larger siblings. The versions, Sonar X3, X3 Studio
and X3 Producer all feature the same 64-bit audio engine, support for
VST3 plug-ins and multi-touch input, along with an unlimited number of
audio tracks, MIDI tracks, busses and sends. In order to improve project
management, tracks and buses can now be coloured for quick visual
reference.

Comping has been streamlined in Sonar X3, and allows mouse-free auditioning and promoting of takes to speed up the production process. Sharing to YouTube, Soundcloud, Facebook and Twitter is also built right into the interface, as is integration with Gobbler, the cloud-based project backup and collaboration service.
The basic version of the software comes with 12 virtual instruments including Cakewalk’s Session Drummer 3. Where Cakewalk have differentiated their X3 products are in the number of instruments and effects offered. X3 Studio ($199) adds built-in Melodyne Essential monophonic pitch correction, time stretching and audio-to-MIDI conversion, all without having to wait for data to transfer into the editor. In total, X3 Studio offers 51 effects including linear phase mastering plug-ins and Nomad Factory’s Blue Tubes FX. There are also 19 virtual instruments with LE versions of Cakewalk’s Rapture 1.2.2 and Dimension Pro 1.5 synths among them.
At the top of the range is X3 Producer ($499) which adds several virtual instruments such as the “superbly thought-out and very playable” Addictive Drums by XLN Audio (http://sosm.ag/jul07-addictive), AAS Lounge Lizard modeled electric piano and Strum Acoustic Session.
Additional effects exclusive to X3 Producer include Tone2 BiFilter2 which provides 47 filter types, Console Emulator and the brand new Tape Emulator module the latter two of which both use Sonar’s proprietary Pro Channel plug-in format.
Sonar X3 is compatible with Windows 7 and 8, and existing users will receive discounts when upgrading.
Sonar X3 announced
Adds Melodyne, Addictive Drums and Gobbler integration
 Cakewalk's new Sonar X3 family of productsThe
newest version of Cakewalk’s Windows-based DAW, Sonar X3, does away
with the Essential moniker for its lowest-priced product and endows its
most affordable Sonar release to date ($99) with the same tools and
track counts as its larger siblings. The versions, Sonar X3, X3 Studio
and X3 Producer all feature the same 64-bit audio engine, support for
VST3 plug-ins and multi-touch input, along with an unlimited number of
audio tracks, MIDI tracks, busses and sends. In order to improve project
management, tracks and buses can now be coloured for quick visual
reference.

Comping has been streamlined in Sonar X3, and allows mouse-free auditioning and promoting of takes to speed up the production process. Sharing to YouTube, Soundcloud, Facebook and Twitter is also built right into the interface, as is integration with Gobbler, the cloud-based project backup and collaboration service.
The basic version of the software comes with 12 virtual instruments including Cakewalk’s Session Drummer 3. Where Cakewalk have differentiated their X3 products are in the number of instruments and effects offered. X3 Studio ($199) adds built-in Melodyne Essential monophonic pitch correction, time stretching and audio-to-MIDI conversion, all without having to wait for data to transfer into the editor. In total, X3 Studio offers 51 effects including linear phase mastering plug-ins and Nomad Factory’s Blue Tubes FX. There are also 19 virtual instruments with LE versions of Cakewalk’s Rapture 1.2.2 and Dimension Pro 1.5 synths among them.
At the top of the range is X3 Producer ($499) which adds several virtual instruments such as the “superbly thought-out and very playable” Addictive Drums by XLN Audio (http://sosm.ag/jul07-addictive), AAS Lounge Lizard modeled electric piano and Strum Acoustic Session.
Additional effects exclusive to X3 Producer include Tone2 BiFilter2 which provides 47 filter types, Console Emulator and the brand new Tape Emulator module the latter two of which both use Sonar’s proprietary Pro Channel plug-in format.
Sonar X3 is compatible with Windows 7 and 8, and existing users will receive discounts when upgrading.
September 1, 2013
August 11, 2013
Reaper: Drum Editing, Part 1
Cockos Reaper Tips & Techniques
Technique : Reaper Notes
In the first of this two-part series on drum
editing in Reaper, we look at getting your transients to land perfectly
on the grid.
In
the first of this two-part series, we’re going to go through the steps
of editing a multi-miked drum kit so that the drums conform to the grid.
Basically, we’re quantising a live drum performance to be in perfect
time. There are many reasons for wanting to do this. You might have
a sloppy drummer who doesn’t play very tightly or in time; you might be
adding the drums to pre-recorded parts that were played to a click; or
you might be locking the performance to other electronic elements like
loops, samples or programming that you need to stay in sync.
To
begin, determine which tracks you’ll want to detect transients from. In
other words, what hits are going to land right on the grid and be
timing references? Will it be simply kick and snare, or will you also
include hi-hats and ride? Using hi-hats (or rides) may be more accurate
but may also create a more robotic feel, and I usually find I can get
away with just using the kick and snare, allowing the hi-hats to roam
freely in the spaces. There may also be tom hits or fills that you’re
going to want on the grid.
Well Suited
Once
you have a good idea of what you’ll be placing on the grid, it’s time
to adjust preferences and options. One of the best things about Reaper
is how customisable it is, but that also means that each Reaper system
can behave quite differently. It’s important that you’re using the right
preferences and options so that your system responds correctly to the
technique we’ll be using here.
Go to
Preferences, and under Project/Media Item Defaults, un-tick ‘Create
automatic fade-in/fade-out for new items’ and ‘Overlap and crossfade
items when splitting’. Under the Options menu, un-tick ‘Auto-crossfade
media items when editing’ and ‘Trim content behind media items when
editing’. The ‘Trim content’ option makes it impossible to put multiple
items on top of one another without replacing (or trimming) the first
one. I normally leave this option on, but you’ll see in the following
steps why it’s beneficial to turn it off for now.
Dummy Track
Next
create a new track or ‘dummy’ track. You’ll only be using this track to
copy the items you want to detect the transient information from. It
won’t actually be heard or used past the editing stage. The purpose of
doing this is to make it easier to see the transients from multiple
tracks all in the same place. You could do it directly on the individual
tracks that you have already, but then you’d have to deal with multiple
stages of splitting (one for kick, one for snare, and so on) and work
on items that have already been split. So it gets messy very quickly!
If
you’re going to use just the kick and snare track to detect transients,
you can copy-drag your kick and snare items to this dummy track. (On
the PC, hold down Control and drag. On the Mac, hold down Command and
drag.) You can do the same with the hi-hat or ride if necessary. For tom
hits that are used in fills (and used as a timing reference), separate
them into items just in the areas where they play and drag them to the
dummy track as well. If the drum part is complex, I encourage you to
work on small sections at a time: intro, verse, chorus, for example.
This way you can see and fix problems more effectively. If the process
is going smoothly, you can begin to work on bigger sections at a time.

Copying
the kick, snare and tom fills to a separate ‘Dummy’ track (grey), makes
it easier to split them when it’s time to use Dynamic Split. Choosing
‘Show overlapping media items in lanes’ will also help to make things
clearer.
When you have multiple items on the same track, it may be hard to see them all at the same time. To fix this:
Turn on ‘Show overlapping media items in lanes’ in the Options menu. You will now see each item in its own lane.
Solo
this track and make sure what you’re hearing is correct. (You should be
hearing just the items that you’ve copied to this track.)
Adjust
the levels of the items so that they’re similar. You can do this
visually or by ear. By performing this step, you will be making it
easier for Dynamic Split (used in the following steps) to split the
transients correctly, based on volume. For example, if the snare hits
were louder than the kick hits, it would be more likely to split the
snare hits, while ignoring some of the quieter kicks. Keeping them
closer in volume should mean that Dynamic Split considers them equally.
Adjust the item levels by grabbing and dragging down from the top of
each item, which creates a volume handle.
Select
all the items on the dummy track and ‘Glue’ them using the command from
the Items menu. You now have one media item with all of the transients
you’ll be detecting from.
Turn off ‘Show
overlapping media items in lanes’ and turn on ‘Trim content behind media
items when editing’. As mentioned previously, I prefer to work with
‘Trim content’ turned on so that any items that land on top of another
will replace (or trim) the items in those sections. This way we’re never
hearing two items on the same track playing simultaneously.
Better Together
You
now need to group all of the drum items on all of the tracks, including
the dummy item. This is important, because when you quantise
a multi-miked drum kit, you don’t want to be moving items separately
from track to track, as the spill will conflict between drums. In other
words, if you move the kick item separately from the snare item
(ungrouped), the kick spill from the snare item would no longer line up
with the actual kick item, causing phase issues and other weird
anomalies. It’s thus imperative to quantise all of the drum items
together, using Reaper’s item grouping.
Just
select all of the drum items, right-click and choose Group/Group items.
Then right-click the Item Grouping icon in the toolbar and make sure
that the ‘Selecting one item selects group’ option is turned off. This
allows you to select just the dummy item while keeping it grouped with
all of the other drum items for editing purposes.
Dynamic Split
The next step is to use Dynamic Split to break up the item based on the transients that have been detected:

Using
Dynamic Split and adjusting the Threshold in Transient Detection
Settings allows you to select the transients you want to Split into
separate Media Items.
Select just the dummy track’s item, go to
the View menu and choose Dynamic Split. This will open the Dynamic Split
items dialogue box.
Under the Split Points section, select the ‘At transients’ tick-box but de-select the ‘When gate opens/closes’ tick-boxes.
Select
(in the lower left) the ‘Set transient sensitivity’ button, which opens
another dialogue box where you can adjust the Threshold that sets what
Dynamic Split considers to be a transient.
Adjust this parameter (there are green lines to help) so that all the transients you need are above the horizontal lines.
Close
this window, go back to the Dynamic Split window and select the option
‘Split grouped items at times of selected splits’. This will split all
of the drum items (grouped) even though the dummy item was the only one
selected. Leave the Leading Pad and Trailing Pad parameter set to 0ms
with the Fade Pad off.
Hit the Split
button. This will separate the dummy track’s media item (glued) and the
drum items (grouped) at all of the transients. Confirm that it is
visually correct before moving on.
Prepare For Landing
Finally, it’s time to quantise the items so that the transients that have been detected land on the grid:

After the items are sliced or split at all of the desired transients, as a group, choose Quantise to place them on the grid.
Delete the dummy track.
Go
back to the Item Grouping icon in the toolbar and turn on the option
‘Selecting one item selects group’ by right-clicking its icon again.
Now, selecting any drum item will select its entire group. Note that,
because many pieces are created by splitting, you now have many separate
groups as well, one for each transient that groups the entire drum kit.
Select
all the drum items (one track will select them all), right-click, go to
‘Item Processing’ and choose ‘Quantise item positions to grid’, which
will open the Quantise dialogue box. Leave all the tick-boxes unticked
and choose the note value for quantisation: decide what the performance
contains (1/16ths, 1/8ths, for example) and hit Process.
At this point, all of the grouped hits should be right on the grid.
Listen
back to the drum recording. It should sound tight, but you may well
notice spaces in the performance where Reaper moved items but didn’t
fill the gaps. Next month, we’ll be looking at how to smoothly fill
those gaps. See you then! 0
August 9, 2013
Online Guitar Tuner Add-on for the Chrome Browser
Free online guitar tuner right in your browser, use the microphone to tune your guitar. Guitar tuning made easy!
Easy to use chromatic guitar tuner. Tune your acoustic guitar using the computer's microphone or plug in your electric guitar.
Features:
- Chromatic: Tune all tones of the chromatic scale.
- Automatic: The tuner detects the pitch automatically.
- Accurate: +/- 1 cent of a semitone.
The application requires Adobe Flash Player 10.1 or later.
The application is tested by the developers in different operating systems, booth on Mac and PC. However, if you experience any problem please make sure that there are no other flash applications running, i.e other flash applications running in other browser tabs. Furthermore, if the tuner is showing strange results try to reload the page so that the application is restarted. If the tuner is not responding, please make sure the input source the tuner should listen to is selected. The settings is found by clicking the settings button (looks like a wrench).
Easy to use chromatic guitar tuner. Tune your acoustic guitar using the computer's microphone or plug in your electric guitar.
Features:
- Chromatic: Tune all tones of the chromatic scale.
- Automatic: The tuner detects the pitch automatically.
- Accurate: +/- 1 cent of a semitone.
The application requires Adobe Flash Player 10.1 or later.
The application is tested by the developers in different operating systems, booth on Mac and PC. However, if you experience any problem please make sure that there are no other flash applications running, i.e other flash applications running in other browser tabs. Furthermore, if the tuner is showing strange results try to reload the page so that the application is restarted. If the tuner is not responding, please make sure the input source the tuner should listen to is selected. The settings is found by clicking the settings button (looks like a wrench).


You can get the tuner at the Chrome Extensions link here:
https://chrome.google.com/webstore/category/app/81-music-and-radio?hl=en-US
August 5, 2013
Some of the largest guitar collections
Joe Bonomo reportedly has one of the largest below.

Slash also has a large collection

and some others...


Slash also has a large collection

and some others...


July 17, 2013
Online Guitar Tuner
One of the many online guitar tuners available is at http://www.123guitartuner.com/
With so many people having smart phones, this is easy to get to and use.

Link: http://www.123guitartuner.com/
July 4, 2013
Reaper Lesson: Non-stop Recording
Non-stop Recording
Cockos Reaper Tips & Techniques
Technique : Reaper Notes
Use Reaper to create an always-on recorder that captures all the inspiration, but none of the chit-chat.

All of the ‘Save live output to disk’ options are available from the one window.
Photo credit
Remember those spontaneous performances when everybody is relaxing during the break, or those moments of inspiration that come while you’re auditioning one of 300 synth patches? It’s a fair bet you weren’t recording when they happened — so wouldn’t it be great to have a recorder that’s always on, ensuring that you never miss an opportunity again?
When
DAT tape became a cheap recording method, I got into the habit of
always leaving a DAT machine in record, patched across the mix bus,
whenever a session was taking place. In addition to proving an
interesting archive of all of the studio chat, it provided a backup
recording of the performances that happened in between takes. There were
many times when the ‘always running’ live recording managed to capture
creative ideas and inspirations and, on a few occasions, these moments
even made it to the final CD.
In this article,
I’ll show you how to use Reaper’s ‘Save live output to disk’ feature so
that you can capture these moments of inspiration whenever they happen,
using your own ‘always-on’ recorder. First, to set up background
recording, select File / Save live output to disk (bounce) or use the
keyboard shortcut Ctrl-Alt-B.
All of the ‘Save live output to disk’ options are available from one window, which offers a surprising number of background recording options. We’ll start with the basic settings.
Output Formats
The
first thing you need to decide on is the output format. By default, the
background recording runs at 24-bit in WAV format, but you can change
this to any of the uncompressed or lossless formats that are supported
by Reaper.
Select your preferred format
from the Output Format drop-down list. You can also downmix to Mono, or
output to up to eight channels by selecting an option from the Channels
list.
Selecting WAV as the output format
presents you with a further list of options for the bit rate and file
format. I usually choose 16-bit, Wave64, as I don’t need full
resolution for these files and I don’t want to keep coming back to
change settings if the recording ends up running for hours.
If you’re restricted for space, try selecting MP3 or FLAC, or lower bit depths for WAV, to limit the file size.
Finally, click the Browse button to select an output file and directory.
In The Background
When
you’re ready to start recording, click the Start button. The window
will disappear and any audio that passes through the master bus will be
recorded to the selected file. You’ll soon forget all about the
recording that’s happening in the background.
Since
there’s no visible indicator in the Reaper user interface to show that
the ‘Save live output to disk’ function is on, it’s easy to forget that
you started it minutes, or possibly hours earlier. Even with a large
reserve of hard drive space, you might wonder if you’re setting yourself
up for one of those nasty ‘Out of disk space’ error messages. Luckily,
some of the other options in the ‘Save live output to disk’ window will
help you avoid this situation, by automatically limiting the file
size.
Selecting the ‘Save output only while
playing or recording’ option will halt the recording whenever the
transport is stopped. This is a great option if you don’t need to
record the chatter between takes, but still want a backup of the
playback or recorded audio. Be aware, though, that there won’t be a gap
between pauses in the output file, so don’t use this option if you
want clean recordings of the output from the master bus.
Selecting
‘Stop saving output on first stop’ will automatically stop the
recording the first time you stop the transport, after starting the
background recording. This option might come in handy if you’re using
the ‘Save live output to disk’ option as a backup while recording a
live performance.
Voice Activation
Selecting
the ‘Don’t save when below’ option turns Reaper into a level-activated
recorder, ideal for dialogue-recording situations where you need to
capture everything people say, but don’t need to record the pauses in
between conversations.


Reaper will pause the recording each time the master bus level drops below the threshold value, for the selected duration, then recommence recording once the level rises above the threshold.
In the example, the final file runs for just on two minutes, even though the ‘Save live output to disk’ option was enabled for over half an hour. Using the ‘Don’t save when below’ option generated quite a small file from over 30 minutes of recording.

Using the ‘Don’t save when below’ option generated quite a small file from over 30 minutes of recording.
Since large-capacity drives are now readily available for little more than a nominal investment, it might be a good idea to purchase a drive to keep your always-on recordings separate from your main projects. With so many situations where an always-on or level-activated recorder can come in handy, it’s quick and easy to have this operating as a permanent feature of your Reaper recording setup. 0
In The Spotlight
Nudge/Set:
Precision editors will love the new Nudge dialogue introduced in
version 3.60, accessed by selecting ‘Nudge selected items’ from the
right-click Item menu. Items can be offset from their current location
(in either direction) by the selected Nudge amount, or moved to a
defined timeline position by using the Set option.
Nudge/Set
operations can be applied to the item start, end, trim, position or
contents, and can also be used to create duplicates of the selected item
at the defined position. Adjustments can be made down to the sample or
frame level.


Better Transport: The mouse wheel can now be used to adjust the start, end and position of time selections when hovering the cursor over the desired field in the transport. Pressing Alt while using the wheel adjusts the value in beats. The project tempo and time signature have also been added to the transport, and can be edited without having to go to Project Settings.
Source: http://www.soundonsound.com/sos/sep10/articles/reaper-workshop-0910.htm
Reaper Lesson: ReaGate Noise Reduction
ReaGate Noise Reduction
Cockos Reaper Tips & Techniques
Technique : Reaper Notes
Reaper’s ReaGate has hidden talents that make it much more than a simple noise‑reduction facility.
In
my view, a lot of DAW users unduly neglect the humble gate at mixdown,
dismissing it as merely an outmoded noise‑reduction utility. This is
a shame, because ReaGate, in particular, does so much more besides this
that I usually have several instances going on every mix I do. So in
this article I want to give a few examples of this plug‑in’s hidden
talents. There’s not space here to cover the basics of gating, so if
you’re new to it, check out the article back in SOS April 2001: it’s
free to view in the SOS article archive at www.soundonsound.com/sos/apr01/articles/advanced.asp.
Assuming, then, that you understand how the Threshold, Attack, Release,
Hold and Range controls of a gate can be used to remove noise and spill
in a recording, the only thing to clarify in the first instance is
that, although ReaGate appears to have no Range control, you can still
implement limited‑range gating using its Wet and Dry sliders.
Pre‑open, Hysteresis & Side‑chain Filtering
The
first thing that sets ReaGate apart from many other gates is the
Pre‑open control, which causes ReaGate to respond earlier than it would
normally.

The secret to ReaGate’s most useful mix applications lies in its ability to select an external side-chain input, which you can see here. Other features that make ReaGate stand out from the crowd are the positive values available on the Hysteresis control and the Pre-open parameter, which provides a ‘lookahead’ function — great for preserving the attack of close-miked drums even when there’s lots of unwanted spill.
This is great for reducing spill on snare‑drum close mics, because it
lets you set a high threshold to avoid the spill without the risk of the
gate opening late and clipping off the drum’s initial transient.

The secret to ReaGate’s most useful mix applications lies in its ability to select an external side-chain input, which you can see here. Other features that make ReaGate stand out from the crowd are the positive values available on the Hysteresis control and the Pre-open parameter, which provides a ‘lookahead’ function — great for preserving the attack of close-miked drums even when there’s lots of unwanted spill.
The Hysteresis control is also great, because it effectively creates
independent threshold levels for opening and closing the gate.
A negative setting here lowers the closing threshold relative to the
opening threshold, and is a well‑known method of combating sporadic
bursts of opening/closing (often called ‘chattering’) when a signal
hovers around a fast‑attack gate’s threshold level. However, ReaGate is
very unusual in that it offers positive Hysteresis settings too, and if
you max out the Hysteresis slider you effectively turn the gate into
a triggered envelope generator, which can be very useful in certain
scenarios. For example, an old mixing trick is to set up a gate as
a send‑return effect, fed from the kick drum, and then to set it up to
create a little 10‑20 ms ‘blip’. Adding this to the mix increases the
drum’s attack, and you can easily adjust the frequency content of that
attack by EQ’ing the ReaGate channel. However, if your kick drum has any
level variation in it (as live parts certainly will), you’ll get
undesirable variations in the length of the ‘blip’, and therefore the
nature of the added attack. Add positive Hysteresis, however, and the
added attack becomes completely consistent.
What
really gives ReaGate its power, though, is the control it gives you
over the signal that’s sent to its internal level detector (or
‘side‑chain’). For a start, the built‑in filters can quickly remove kick
and hi‑hat spill from the side‑chain when you’re gating a snare
close‑mic recording, improving the triggering reliability. It’s easier
to hear what you’re doing if you click the Preview Filter Output button
to audition the side‑chain on its own. However, if these filters aren’t
man enough for the job, you can use ReaEQ instead.
First
select Auxiliary Input L+R from ReaGate’s Detector Input drop‑down, and
then insert an instance of ReaEQ above ReaGate in the effects window.
Click ReaEQ’s routing button (labelled ‘2 in 2 out’). Now click the
little plus sign in the routing window to increase the number of Track
Channels, and then change the plug‑in’s output setting from 1+2 to 3+4.

You can route a send to ReaGate’s external side‑chain input by sending it to Track Channels 3+4.

You can route a send to ReaGate’s external side‑chain input by sending it to Track Channels 3+4.
Automated Mix Balancing
Nice
though all these things are, the most useful application of ReaGate for
me is in automated mix balancing. Let me explain. Imagine you have
a drum overheads recording where the cymbals are overpowering the snare.
Most people’s first instinct is to rebalance this by using the snare’s
close mic, but that mic usually just goes ‘donk’, rather than sounding
like a real snare drum. A better solution is to boost the level of the
overheads during each snare hit, giving you more of the natural sound of
the snare in the room.
The way to do this is to
insert ReaGate into the overheads channel and then feed its side chain
from the snare close‑mic. Switch ReaGate’s Detector Input to ‘Auxiliary
Input L+R’, and then drag the snare track’s IO button to the overheads
track to create the required send. When the little send controls window
pops up, take the opportunity to do two things:
Change
the ‘=> 1/2’ setting to ‘3/4’, using the ‘New Channels On Receiving
Track’ submenu. This ensures that the snare close‑mic signal is fed
to the ReaGate side‑chain inputs.
Change
the ‘Post‑fader (Post‑pan)’ setting to ‘Pre‑FX’. Although this isn’t
strictly necessary for triggering purposes, it does mean that mix tweaks
to the snare channel won’t make a nonsense of your ReaGate settings.
Now
adjust the ReaGate controls to try to get a reliable burst of overheads
signal occurring on each snare hit. Once you’ve achieved that, pull the
Wet slider right down and set the dry signal to 0dB, so that the gate
is doing precisely nothing. From this starting point, slowly inch up the
Wet slider during playback until you get a better snare level in the
balance. Bear in mind, though, that there’s only so far you can usually
go with this dodge before the gating begins to sound unnatural (above
about 6dB, usually), and you may also need to work a little with the
ReaGate Release control to get the most musical‑sounding snare decay.
Ducking At Mixdown
An
extension of this auto‑balancing idea is made available by the ‘Invert
Gate’ tick box under ReaGate’s Wet slider. What this does is
polarity-invert the wet signal relative to the dry signal, so that they
phase-cancel whenever the gate is open. The practical result is to turn
the gate into a ducker, a processor that is rare in software form but
extremely useful at mixdown.

The unassuming little ‘Invert Gate’ tick box converts ReaGate into a ducker, which is another very useful, and frequently underestimated, mix processor.

The unassuming little ‘Invert Gate’ tick box converts ReaGate into a ducker, which is another very useful, and frequently underestimated, mix processor.
The classic application for ducking is clearing
space in a guitar‑heavy mix for the lead vocals; it makes the singing
clearer by turning down the guitars during vocal phrases. You set it up
almost exactly as in the previous snare example:
Insert ReaGate on your guitar submix channel, feed its side‑chain from the lead vocal, and activate the Invert Gate facility.
Set
up reliable triggering from the vocal. To hear what you’re
doing clearly, keep the Wet slider at 0dB and pull the Dry slider all
the way down.
Once the triggering’s sorted
out, pull down the Wet slider and set the Dry slider to 0dB, then play
back your mix and slowly increase the Wet level to subtly introduce the
ducking.
If you want to know how much you’re
ducking, check the Range table. Again, you can usually only push this
effect so far before it sounds unnatural, but that’s not too much of
a bind, as even a decibel or two of ducking can still make
a considerable difference to the vocal sound. 0
Audio Files Online!
For audio demonstrations of these techniques, go to www.soundonsound.com/sos/may11/articles/reaperaudio.htm.
MIDI Output

It’s easy to generate MIDI notes from a drum part using ReaGate’s Send MIDI On Open/Close option, whereupon you can use the simple ReaSamplOmatic sample player to trigger a replacement sound.

Although there are now many sophisticated software drum replacers available, I have to say that I still end up using ReaGate for this most of the time. All you have to do is tick ‘Send MIDI on Open/Close’, and the plug‑in will squirt out a user‑specified MIDI note whenever the gate opens. Follow ReaGate with ReaSamplOmatic5000: for quick results in ReaSamplOmatic5000, load in a sample (from the Browse button), select ‘Sample’ in the Mode drop‑down menu, and untick the ‘Obey Note‑off Messages’ option. Admittedly, ReaGate doesn’t provide any fancy MIDI velocity options, but I rarely miss those in practice, and what ReaGate does offer is masses of features aimed at making its triggering reliable, which I find much more important in most situations.
Source: http://www.soundonsound.com/sos/may11/articles/reaper-tech-0511.htm
ReaGate Noise Reduction | Media
Cockos Reaper Tips & Techniques
Technique : Reaper Notes
Using Reaper’s ReaGate Plug-in: Audio Examples
In
May 2011’s edition of Sound On Sound, we looked at using Reaper’s
bundled gating plug-in — ReaGate. Here, Mike has supplied audio examples
to demonstrate the techniques used in the workshop, which can be read
in full by going to www.soundonsound.com/sos/may11/articles/reaper-tech-0511.htm.
Download | 3 MB
The first set of audio examples show how the
side-chain filtering and Pre-open facilities of Reaper’s ReaGate can be
used to deal with a challenging spill-reduction task.
Snare01_Ungated
Here’s
a live snare-drum close-mic recording. As you can hear, there’s masses
of hi-hat and kick-drum spill, which I want to reduce.
Snare02_Gate
For
this file, I’ve applied ReaGate, using 0ms Attack and 44ms Release
settings so that I can hear the triggering action clearly. (I’ve also
dialled in 3ms of Hold time to reduce gate chattering, in the light of
the fast attack/release times.) I’ve set the Threshold to -27dB, which
is as high as I can get it without losing any of the snare hits, but
despite this both the kick and hi-hat parts are causing the gating to
misfire.
Snare03_Gate_SCFilters
To
improve the triggering, I use ReaGate’s built-in side-chain filtering
options to reduce the levels of kick-drum and hi-hat spill in the
detector signal. Setting the Highpass slider to 674Hz and the Lowpass
slider to 4869Hz does the trick, as you can hear in this example: the
gate now opens only when it should.
Snare04_Gate_FilterListen
In
order to set up ReaGate’s side-chain filters for the
Snare03_Gate_SCFilters example file, I engaged the plug-in’s Preview
Filter Output button so that I could audition the filtered detector
signal directly and refine them by ear. Here’s what the side-chain
signal sounded like by the time I’d finished refining the Highpass and
Lowpass settings. Although it sounds nasty and boxy, it does give the
snare a balance advantage for detection purposes. Compare this with the
Snare01_Ungated file to remind yourself of the original unfiltered spill
levels.
Snare05_Gate_PreOpen
Although
the gate in the Snare03_Gate_SCFilters audio example is now triggering
only on the snare hits, its Threshold has had to be set so high that the
gate is slicing off a little of the initial snare transient, even with a
minimum 0ms Attack setting. ReaGate’s Pre-open facility provides a way
to improve this aspect of the processed sound. In this example I’ve
applied 6ms of Pre-open, which helps the drum onset sound crisper.
Snare06_Gate_Smooth
So
far I’ve deliberately kept ReaGate’s Release setting short and its Dry
slider all the way down so that I could easily hear the finer points of
the gating action. However, in practice a longer release time will give a
more musical-sounding snare decay, and the gating range needn’t be
nearly so extreme: some spill between the mics in a drum kit is usually
beneficial to the sound, so all you really want to do is reduce the
spill on this snare close-mic to a more suitable level. In this audio
example I’ve attended to both these issues, setting the Release to 115ms
and reducing the gating range to 8dB (Wet slider at -4.4dB, Dry slider
at -8dB). Compare this to Snare01_Ungated to hear how far we’ve come
from the original recording.
Kick01_Raw
This
audio example contains a section of the kick-drum close-mic track of a
live drum recording. As you’d expect of a real performer, there is some
inconsistency in the bass-drum levels through the track.
Kick02_ParaGate
One
way to add low-end attack to a kick-drum sound is to set up a fast gate
as a send effect to isolate a little ‘blip’ from each hit, EQ that blip
primarily into the low-frequency region, and then mix it back in with
the unprocessed kick sound. This audio example demonstrates the kind of
sound such a gated send channel would have when fed from the kick-drum
track in the Kick02_Raw audio file. The processing comprises an instance
of ReaGate (Attack: 0ms; Hold: 22ms; Release 6ms) followed by a 940Hz
low-pass filter in ReaEQ. Note that the weight and tone of the blip
changes from hit to hit in response to the inherent level changes in the
live performance.
Kick03_ParaGateMix
This
audio file shows how the gated send in the Kick02_ParaGate example
enhances the raw kick-drum sound of the Kick01_Raw file when they are
mixed together. Again, note the inconsistency of the low-end attack.
Kick04_ParaGateHysteresis
This
file demonstrates how the ‘blip’ in the Kick02_ParaGate example can be
made to sound more consistent when ReaGate’s Hysteresis is increased to
its maximum value of +24dB, effectively transforming the gate into a
triggered envelope generator.
Kick05_ParaGateHysteresisMix
Here
you can listen to the effects of the Kick04_ParaGateHysteresis file’s
improved gated send processing when it is mixed with the unprocessed
kick-drum recording of the
Kick01_Raw file. Compare this with Kick03_ParaGateMix to hear the difference in consistency at the low end.
Kick01_Raw file. Compare this with Kick03_ParaGateMix to hear the difference in consistency at the low end.
Overheads01_NoGate
Here’s
an example of a drum overheads track, recorded from Toontrack’s
Superior 2 virtual instrument, where the cymbals are overpowering the
snare-drum sound.
Overheads02_Gate
Inserting
an instance of ReaGate on the overheads channel and then triggering it
from one of the snare close-mics is able to significantly increase the
snare level in the overheads balance.
Ducking01_NoDuckingFullMix
This section of a full mix contains a lot of overdriven guitar parts, which make it difficult to retain vocal clarity.
Ducking02_NoDuckingGtrsSolo
Here
are the two main guitar parts within the Ducking01_NoDuckingFullMix
file. Note that they are currently pretty consistent in level throughout
this section of the production.
Ducking03_DuckingGtrsSolo
Inserting
ReaGate on the guitar tracks, switching the gate’s operation to ducking
using the plug-in’s Invert Gate tickbox, and then feeding the detection
side-chain from the lead-vocal part results in the following ducked
guitar sound. Notice that the ducking is pretty obvious when heard in
isolation like this.
Ducking04_DuckingFullMix
Here’s
a version of the full mix previously heard in the
Ducking01_NoDuckingFullMix example file, but with the guitars ducked
along the lines audible in the
Ducking03_DuckingGtrSolo demonstration. Note how the ducking is much less obviously audible within the full-mix context than when the guitars were soloed, but nonetheless significantly increases the sense of lead-vocal clarity. 0
Ducking03_DuckingGtrSolo demonstration. Note how the ducking is much less obviously audible within the full-mix context than when the guitars were soloed, but nonetheless significantly increases the sense of lead-vocal clarity. 0
Source: http://www.soundonsound.com/sos/may11/articles/reaperaudio.htm
Subscribe to:
Posts (Atom)