August 20, 2011

IK Amplitube 3 VST is now a free download


AmpliTube 3 for free and Custom Shop open for business

Get Orange, Fender, Ampeg, Soldano and other gear in your IK software
Ben Rogerson, Fri 15 Apr 2011, 10:23 am BST
AmpliTube Custom Shop
The AmpliTube Custom Shop is rammed with classic gear.
IK Multimedia has announced a major revamp of its AmpliTube software, with version 3.5 adding the new Custom Shop feature. What's more, there's now a free version of AmpliTube that allows you to access the Custom Shop.
The Custom Shop enables you to pick and choose new amps, stompboxes, cabs, mics and rack effects that are modelled on products from the likes of Fender, Ampeg, Orange, Soldano, Groove Tubes, Gallien-Krueger, THD and T-REX. Over 200 models are currently available, with more to come.
Purchases at the Custom Shop are made using a credits system, with prices starting at $3.
The free version of AmpliTube offers nine stompboxes, four amps, five cabs, three mics, two rack effects and a digital tuner. The price of the full version, which contains 160 models, remains at €270.
Read on for the official press release from IK Multimedia.

AmpliTube 3.5 and Custom Shop press release

IK is proud to announce the release of a FREE Version of AmpliTube 3 with the new built-in Custom Shop Feature. The Custom Shop is an entirely new tone shopping experience that is like visiting a real guitar store, but one that is open 24/7 right in the comfort of your own studio. The AmpliTube Custom Shop has the widest offering of legendary, officially certified brands and a price model affordable to anyone for building your truly custom tone.

Download a free, fully functional version of AmpliTube 3
Start by downloading a FREE, fully functional version of AmpliTube 3 with all features and a collection of 24 free gear models:
  • 9 stomp boxes
  • 4 amplifiers
  • 5 cabinets
  • 3 microphones
  • 2 rack effects
  • digital tuner
Try the brand new Custom Shop feature 
Then use the included online Custom Shop to try and buy more models à la carte.
  • Choose from over 200 à la carte gear models of stomp boxes, amps, cabs, mics and rack effects
  • Official manufacturer approved models of legendary guitar and bass gear brands including Fender™, Ampeg®, Orange®, Soldano™, Groove Tubes®, Gallien-Krueger®, THD® and T-Rex® with more to come
  • Every model has its own free trial available
Pricing and Availability
  • Current AmpliTube 3 users
    Current AmpliTube 3 users should go to their user area and download the new 3.5 version to gain full access to the new Custom Shop as well as many new features: 64-bit plug-in compatibility, an improved preset browser with full graphical display of the rig, 4,000 new "patch" slots that store controller information with the presets, improved integration with IK's range of controllers (like the StealthPedal and StompIO) with full programmability directly from AmpliTube, improved MIDI control, "sequences" for organizing live playing presets and much more.
  • Current Powered by AmpliTube users
    Users of AmpliTube Fender™, Ampeg® SVX, AmpliTube Metal, AmpliTube Jimi Hendrix™ and AmpliTube 2 Live can use all of their existing gear models in the new AmpliTube 3 FREE version which includes the Custom Shop. All the user's gear is available inside the new AmpliTube 3 host which allows users to take advantage of the full features of AmpliTube 3 that were not available in their original packages – similar to what was previously done with AmpliTube X-GEAR – as well as access the new Custom Shop to expand their model collections. All other registered IK users can also find AmpliTube 3 FREE in their user area for immediate download.
  • New to AmpliTube
    New IK users can download the FREE version by registering here:
    www.amplitube.com/customshop/download

    Or purchase the full version of AmpliTube 3 with 160 models and the built-in Custom Shop feature for $349.99 / €269.99.
  • Gear models starting as low as $3!
    Models are priced in Gear Credits: prices range from 5 to 20 credits per model. Credit purchase system starts at $1 per credit and drops down to $0.60 per credit when credits are purchased in bulk. Plus, JamPoints can be applied to model purchases (up to 50% discount) and also earned with every purchase.
More information, product trailer, and video demos are now online. Check them out and download AmpliTube Free and it's new built-in Custom Shop feature today!

Source: http://www.musicradar.com/news/guitars/amplitube-3-for-free-and-custom-shop-open-for-business-424291


IK Multimedia AmpliTube 3 €318

The king of amp sim software returns better than ever
Computer Music, Fri 16 Apr 2010, 12:19 pm BST
IK Multimedia AmpliTube 3
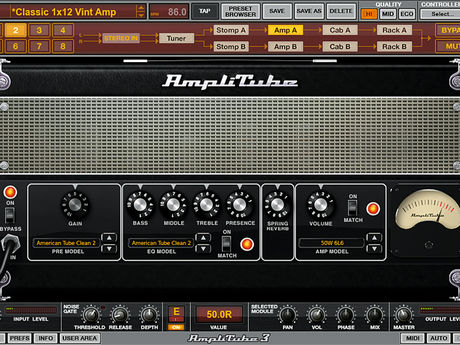
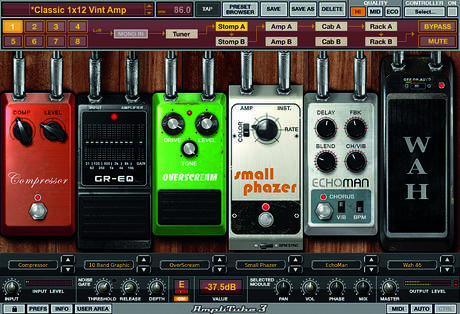
AmpliTube 3 adds models from the Metal and Hendrix editions of the software.
The AmpliTube series of amp modelling software launched back in 2002 and became an immediate success due to its solid tone backed up by a wide array of amps, cabs and effects, decent routing and slick graphics. We've since seen v2 and various 'spin-offs', such as the Ampeg SVX bass amp, Jimi Hendrix, Metal and Fender packages, and the X-Gear 'shell'.
AmpliTube 3 builds on this success, combining an overhaul of existing features with the introduction of many new ones. On the technical side, modelling techniques first seen in last year's AmpliTube Fender are present, these being IK's third-generation Dynamic Saturation Modelling and Volumetric Response Modelling (used for rotary speaker effects).
All existing AmpliTube 2 models are present in v3, but they've been reworked to improve efficiency and dynamic response. There are new models in v3 (amps, cabs, pedals and effects), including some from Metal and Jimi Hendrix, so you're now looking at over 160 modelled elements in total.

In detail

The cabinet and miking section has received a substantial upgrade in terms of both choice and flexibility and both pedal and rack sections now thankfully include drag/drop and copy/paste functionality. Routing-wise, AT3 can now operate in full stereo mode, making it useful for general effects processing of non-guitar signals.
Meanwhile, in standalone mode there's an expanded four-track recorder with track-independent timestretch, which serves as an excellent tool for learning parts. The greatest functional improvements in AT3 have been drafted from X-Gear.
You can assign custom automation and MIDI CCs (up to 16 of each) using the context-sensitive menus or MIDI/Auto pages, plus there's built-in support for IK's StompIO and StealthPedal (of course, the forthcoming StealthBoard will also be fully supported).
AT3 can access the modules of all other AmpliTube products that you own, too. They appear in categorised menus, effectively doing away with the need for X-Gear. It also prepares for the imminent arrival of model 'singles' (ie, amps, effects, etc, sold on an individual basis).

Modules

One of AmpliTube's big selling points has always been its variety of modules. New amps based on Orange, Mesa/Boogie and even bass designs, such as Trace Elliot and Gallien-Krueger, spread the net wider still, so you now have 31 amps in all.
Amplitube 3
The pedals have also multiplied (now 51 in total), and to give you some idea of the breadth of selection, there are four types of wah wah, seven fuzz pedals and 11 distortions. New for the rack are the Step Filter, Step Slicer and Tap Delay.
There are now 46 cabinets to choose from - that's 30 more than AmpliTube 2 - and these are categorised by style (guitar, bass, rotary) and size (6, 10, 12 and 15 inch). Finally, there are 15 mics, including three ribbon models.

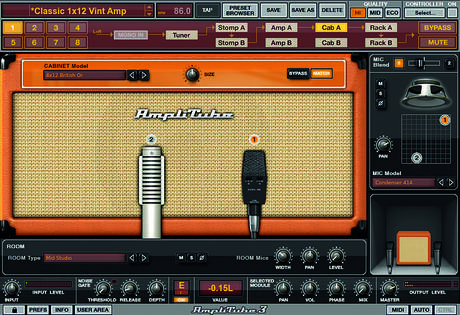
In fact, AmpliTube 3 has a much-improved cabinet and miking section. In addition to the many cab types, you now get two flexible close mics and a stereo room mic option. There are 15 close mics, which can be positioned anywhere in the left to right or near to far planes (though you can't change their angle). You move them by grabbing them or using the positioning graphic to the right. Pan, solo, mute and phase invert can also be selected individually and there's a mic blend slider, too.
Amplitube 3
The stereo room mic is simpler and includes mute, solo and phase flip, plus width control, pan and level. Once again, you can adjust it using the controls or the graphic. You'll also find a selection of five room types: amp closet, small studio, mid studio, large studio and hall.
Rounding things off is the cabinet size control. This enables you to artificially inflate or contract the size of the cabinet (75% to 125%).
Overall, the new cabinet implementation is wonderful, and the only shame is that you can't import your own impulse responses into it.
Moving on, there's a whole new set of presets to contend with, and a new preset browser page with various categories. Oddly, this didn't seem to incorporate patches from our other IK amps, which is a shame. Note that while AT3 replaces the models from AT2, you can still open your AT2 presets, although they may sound slightly different using the 'remastered' models.

Sound

Like its predecessor, AT3's strength lies in mimicking rock guitar amps, and if you like 'dual rectified', US-style rock sounds, you won't be disappointed as the Mesa/Boogie, Randall and Peavey amps really deliver.
Similarly, UK classics (AC30 and Marshall) have a strong presence, and the addition of more bass amps is also welcome. Fender amps are well represented, but there's enough differentiation from AmpliTube Fender for each to remain an attractive buy.
For huge stereo rock guitars, the flexibility of the routing comes into its own (you can use two complete setups at once, and there are eight routing options), and we also had great success using the new amp miking system to combine spread mics with a touch of room sound.
"Like its predecessor, AT3's strength lies in mimicking rock guitar amps."
Pretty much every flavour of fuzz and distortion can be found in the pedals, while sweet swooshes and warm wobbles can be had with the Electro-Harmonix style Small Phaser and Electric Flanger, as well as the Uni-V, which is, of course, a Uni-Vibe imitation. Advocates of the crazy Digitech Whammy pedal will also be thrilled to set foot on the wild Wharmonator.
With such a bewildering selection of modules, you'll be glad of the presets, and although some rely too heavily on the rack effects, such all-encompassing sounds can be pretty seductive and inspiring when jamming by yourself, making a good starting point.
Sonically, IK have upped their game with AT3, as it's very much on a par with the outstanding AmpliTube Fender, yet offers a wider range of tones. The only downside is that complex patches can put the pressure on your CPU.
However, you can reduce the quality of individual sections in the Prefs menu (as in previous versions), or use the new Eco, Mid and Hi front panel options to ease CPU load - these act much like Prefs combination presets.

Summary

In recent times, an influx of upstart quality amp plug-ins has begun to chip away at the established names, but we reckon none of them offer quite the flexibility and choice of AmpliTube 3. Disputes will no doubt forever rage over which amp sim package sounds 'best', but you've got to hand it to IK for continuing to turn it up to 11.

Check out our AmpliTube 3 audio demo to hear:

1. The amps: we run through all of the amp models
2. Clean rigs:
 a taster from the clean rigs folder
3. Effects:
 some of the more interesting effects rigs

Verdict

A great update that sees AmpliTube 3 hanging in there as one of the premier amp sims for tone, flexibility and choice.
MusicRadar rating:
4.5 of 5 stars

April 28, 2011

Cakewalk Sonar X1 Producer Review

From PCPro Magazine-04-13-2011

Some software is so mature and refined that it's difficult for developers to convince its users to upgrade. Not so for music-production software, though. Recording musicians and engineers seem to have an insatiable desire for high-tech tools that push their productions into new territory.

Cakewalk Sonar has often risen to this challenge, but as the features mounted, so too have the number of buttons, menus and right-click commands. The result is that Sonar had a steeper learning curve than its rivals.

Sonar X1 aims to address this with a new interface, dubbed Skylight. Its tabbed panels make more efficient use of the screen than the floating windows of old, and much of the onscreen clutter has been reworked into a more approachable Control Bar. The transport controls and tools palette appear here too, and a new Smart Tool uses context-sensitive commands to reduce the amount of tool switching required. We like the Command Bar's use of big buttons, but it's a shame it doesn’t fit on a Full HD screen; we had to hide some modules to see what had fallen off its right edge.
Cakewalk Sonar X1 Producer
The revised Browser window is docked on the right and gives access to media, along with plugins that are available or in use. We appreciate the ability to jump directly to the various bundled media libraries, and also to audition REX loops at the project tempo – although this audition feature was initially routed no go nowhere, resulting in silence. Drag and drop is more comprehensive, but it still can't match the intelligence of Ableton Live for anticipating users' intentions.

A MultiDock window at the bottom houses the mixer and the various audio and MIDI editors. It certainly makes Sonar look tidier than before, but it's a shame these haven't been optimised to fit into a narrow strip along the bottom of the screen. At least it's quick to switch to a more spacious MultiDock window using the Screensets feature, or to undock any of the panels and arrange them over multiple monitors.

The Inspector panel on the left reveals not just the selected track's mixer channel but also the bus channels it's routed to. It also houses another impressive new feature in Sonar X1: the ProChannel. This is essentially just a combination of compression, EQ and tube saturation effects, but the quality of each one is a step up from the effects bundled with competing packages.


The compressor has two modes. One is modelled on the classic Urei 1176 hardware compressor with its distinctive presence and gutsy punch; the other is based on an SSL 4000 Series bus compressor with a smoother response that's better suited to treating submixes. The six-band EQ has three modes - Pure, Vintage and Smooth - but they share the same controls, making it easy to switch between them and assess their subtly different tones.

It's not just the rich, musical sound quality of the ProChannel effects that make it so welcome. It's also the fact that it's plumbed into every channel in the mixer by default, significantly speeding up the time it takes to get a mix up and running. Our one quibble is that it can only be positioned before or after other effects in a chain and not in the middle. Having an option to load it as a normal plugin would make it more versatile.

Cakewalk Sonar X1 Producer

It’s not easy reinventing a user interface without alienating existing users, but once they’ve re-learned a few tasks there's still a lot here that should feel familiar. In fact, we'd argue there's a little too much. Despite the raft of interface changes, we still encountered various niggling issues.
Mix automation is generally well implemented but there's no way to automate the bypass switches for the bundled Sonitus effects plugins. Opening a MIDI piano roll editor usually just revealed blank space, leaving us to scroll around to find the notes. Preset management for the supplied virtual instruments is untidy, with various redundant controls that suggest there are no presets available at all. The metronome can also only be toggled on and off when playback is stopped, which we found seriously frustrating. Long-standing Sonar users may be immune to these issues but they reveal a lack of attention to detail next to Steinberg Cubase or Ableton Live.

Where Sonar wins hands down, however, is value. The flagship X1 Producer costs around £150 less than Cubase 6, and yet the quality and quantity of its bundled effects and instruments are notably superior. Ableton Live costs £300 inc VAT, but a fairer comparison is Ableton Suite with its bundled instruments, which costs £500. Finally, those who don't need Sonar's extensive plugin bundle should consider X1 Studio, which costs just £169. (The full comparison chart is here.)

All-in-all, we still prefer Cubase 6 for its more elegant editing tools, but Sonar X1 Producer is a viable alternative for those who need a cost-effective package they're unlikely to grow out of.

April 6, 2011

Classic VST Plugins for Home Recording - Free

Classic VST Plugins For Home Recording

Since I am a guitarist and love computer technology, it would not be right if I did not include some articles on home recording.  I am by no means an expert in this area.  Music is a hobby for me and I learn from others experiences and good old fashion trial and error.   
Some home recording software suites can be quite expensive depending on how in depth you want the production to be.  Having a rack mount of hardware effects can also add up to much money.  These software effects do a solid job of mimicking their hardware counterparts. 
Today I would like to show you some of my favorite VST plugins which are completely free and work very well.  Usually when I am recording my guitar and bass I mic the amp to try and get the best possible "real hardware" tone that I can, then use VST plugins to mix the different tracks. All of the following can be downloaded from Kjaerhus Audio. You can get them here:
http://www.acoustica.com/plugins/vst-directx.htm

Classic Chorus
chorus
Classic Flanger
flange
Classic Compressor - (This is probably my favorite VST plugin)
compress
Classic Reverb
reverb
Classic Delay
delay

Once you download these programs you simply add them to the VST folder of your home recording program.  These effects can be used on any sounds you record including guitar, bass, drums, vocals … etc.  The main thing I have learned is to experiment like a mad scientist!  It's a lot of fun and you never know you might become the next Rick Rubin!
This article was originally written on 08/21/07

Source: http://blogs.howtogeek.com/mysticgeek/2007/08/21/classic-vst-plugins-for-home-recording/


Other sources of free VST Plugins:

http://freevstplugins.blogspot.com/

http://www.sadglad.com/freevstplugins6.html

http://www.vstplanet.com/

http://free-plugin-list.com/

http://www.vst4free.com/

http://www.audiomastermind.com/browse-free_vst_plugins-5886988-1.html

http://free-loops.com/free-vst-plugins.php

http://www.computermusictutorials.com/index.php?topic=VSt

http://www.vstcafe.com/


http://www.kvraudio.com/get.php


How Dynamic Range Changes Audio We Hear

HTG Explains: How Does Dynamic Range Compression Change Audio?

banner

Dynamic Range Compression is used in everything. Most audio editors have a “compressor effect,” and mastering it can mean the difference between an amateur and pro-level mix. To understand how it works, we need to see what exactly it does.

Dynamic Range Compression

First of all, this should not be confused with general “audio compression,” which is data compression and covers things like MP3 conversion. We’re most definitely NOT talking about compression of quality for space-saving reasons. If that’s what you’re looking for, check out HTG Explains: What Are the Differences Between All Those Audio Formats?
We are talking about compression of the dynamic range of sound in an audio track. If you record a pin-drop followed by a TNT explosion, you’ll notice that there’s a very large difference in the intensities of those two sounds. That’s what we refer to as dynamic range. Now, our ears are pretty good at working with large differences like that, but audio equipment isn’t. If you ever watched a war movie where the actors’ dialogue was drowned out by gunfire, then you know what I’m talking about. Granted, that would be difficult to hear in real life as well, but the audio equipment involved in the process makes it pretty unintelligible. That’s where a compressor comes in.

Atomisonic_Dynoray_Front_Panel

The image above shows a rack-mounted compressor, which will take an audio signal and adjust it based on several parameters. It’s a lot like having a personal audio engineer that will constantly adjust the signal to where it “should” be, as it’s running through the system. Compressors are usually physical devices that process signals that can be chained to other effects and processors, but the effect can also be applied via software. You can adjust the levels he starts to turn the knobs at, how quickly he acts, and how much compression is applied over what time period, but that’s what his focus is limited to. This reduces the dynamic range in predetermined ways so that the result is uniform audio, or at least audio whose loud and soft ends are much closer to each other.

As an Effect

Compressors can be used for artistic effect, too. It can enable singers to whisper just as loud as the distorted guitar. This result that wouldn’t really work as well by just adjusting the volume, especially if the singer suddenly switched from whisper to all out scream. Let’s take a look at some examples.
Listen at around 0:43 for the bass drum; you’ll heard the rest of the track’s volume drop.
For the Killers’ benefit, I’ll assume the effect here is intentional. You can hear when the bass drum kicks starting around 43 seconds in that the volume of everything else drops a bit. This particular use is often heard in the various techno-subgenres to accent beats. Though its use can be deliberate, this “pumping” is most often a sign of a badly- or over-compressed song
Listen for the lead singer’s high-powered vocal at 0:22, and a low-powered one at 1:29.
At 22 seconds in, you can hear Amy Lee push a high-powered vocal that’s close to a scream, but it sounds muted. At 1:29, you can hear the layered background vocals being whispered, but the volume is normal. And, of course, you can hear that pumping effect while the audience is clapping throughout the video.
Both of these examples show what DRC can do in isolated circumstances, i.e. as an effect on a particular clip. It’s somewhat harder to illustrate how compression is utilized in its more mainstream usage.

Constant Volume

clipping_compared_to_limiting
Image illustrating various compressor configurations to limit volume (from Wikimedia Commons)
DRC works well as a more advanced volume limiter that prevents the signal from clipping, which can distort the sound quality and damage sensitive equipment. It’s universally used to smooth out an audio track so that when an equalizer is applied afterwards, you reap more of the benefits. DRC is also used in movies so that in loud scenes, you can still hear the actors’ dialogue, or so that the dying whisper of a victim is still loud and clear after the gunshot that ended him. It can still preserve some of the dynamic effects, however. Let’s take the example of a band.
The drums are a really dynamic and overall loud part of a band. If the drum track is uneven, it’s pretty noticeable. Say the drummer’s tired or makes some slight mistakes throughout the track. Some parts of the track will have louder bass kicks than others. Using a compressor will even that out so that the lighter kicks will be just as loud as the normal ones, and the harder kicks will be toned down a bit. Snares can also by toned down by dampening the initial strike, thus allowing the “crack” that follows to become more prominent.
On a bass guitar, the higher notes will be louder and punchier than the lower ones. A compressor will keep the low tones loud and higher ones soft. On the other hand, when you use slaps to accent, you can keep them from spiking too high and being distracting, but still keep them sharper than the normal bass notes. You can also increase how long the note is sustained at a higher volume.
Guitarists often can get carried away with their playing. Compressors can make sure that the lightly plucked or strummed notes stay light and the heavier ones stay loud. After a certain point, heavy strumming starts to distort the audio. Setting the compressor’s threshold – more on that later – to less than that will prevent entranced guitarists from messing up the track. You can also alter the sustain.
In the same vein as the bass guitar, singers tend to sing louder at higher pitches and softer at lower pitches, depending on their range. You can keep the singer’s pitches even without requiring the singer to put more or less power behind them.
In these ways, dynamic range compression can be used to smooth out smaller fluctuations in performance by artists. This allows a more uniform sound but still allows musicians to deliberately emphasize certain notes and cadences. It doesn’t get rid of the dynamic range of sounds completely, it just makes it so that the musician has to put more effort into it. All of this is especially important at live shows where performances are highly variable and much more sensitive to the performers’ stamina and frame of mind.
Listen to the first 20 seconds, focusing on the change between the intro and the rest of the song.
In this example, the Cancer Bats decided to compress the dynamic range over the whole song, not one particular track. Pay close attention to the end of the intro, at around 14 seconds in. The guitar is loud when it’s in focus, but as the rest of the instruments kick in, it drops down and mixes in. The overall volume of the song doesn’t change through the transition. You’ll hear a bit of pumping, too, but not as much as in the other songs. Unless this is the specific effect you’re going for, this is often considered a “poor” use of compression.
Listen to the end of the solo intro at about 0:07.
Here, Daath used DRC over individual instrument tracks. You can tell because the guitar in the first few seconds of the song is a particular volume, and it’s maintained through the rest of the song. Unlike the Cancer Bats’ song above, Daath’s song gets louder when the other instruments come in by a more noticeable amount. This is good example of “good” compression; as the Futurama quote goes, “When you do things right, people won’t be sure you’ve done anything at all.”
Ultimately, it depends on what you want. Professionals say that compression should be used on each individual track, then if needed, over the final track as a whole. Dynamic range is good because it adds flair, nuance, and color to audio. Compression is used to illustrate that where musicians want it to be, and that’s done by reducing variation elsewhere. On the other hand, compression can add its own effect to audio. Several artists and even the majority of some genres use this for a specific feel, as an artistic effect.

Compression Parameters

drc in audacity

Compressors are built in different ways. Some use tubes, others use valves, some use light sensors and LEDs, and the cheaper ones use solid state parts. Different types of DRCs will “color” the sound differently, albeit slightly. The goal isn’t to change the sound itself, of course, but having an expensive tube compressor that makes the audio sound warmer certainly won’t hurt. Whether cheap or expensive and regardless of the mechanism, they all work to see the signal and adjust the volume. Compressor effects essentially mimic hardware compressors; above you can see the pane for the compressor effect in Audacity. Both focus on a handful of parameters.
Threshold: This is the level at which the compressor will act. This can be set to the minimum or maximum volume, but it’s more commonly used as a guide post at which the compressor enacts changes. After this point, increases (or decreases, if used to bump upwards) in volume are significantly dampened.
Ratio: This is ratio by which the exceeding output is reduced. A 20:1 ratio will reduce whatever exceeds the threshold by that much, so 20db over the threshold will come out of the compressor as 1db over. Because the decibel system is logarithmic, this is has a much more pronounced effect on the volume. Really high ratios, like 20:1, 60:1, or infinity:1, effectively hard limit the volume.
Attack: The signal isn’t altered by the compressor immediately; there’s a slight delay. Attack allows you to control this delay. It’s measured usually in milliseconds, so higher values will allow spikes of volume through the threshold before behind compressed, making guitars sound more punchy. Lower values will help with hard limiting.
Audio_Compression_Attack_and_Release-2
Image diagramming a compressed signal in comparison to its original signal (from Wikimedia Commons)
Release: Compressed sound can be immediately returned to their actual volume or they can held at the threshold for longer. Using a higher value for release will help increase the “sustain” of a guitar or bass, allowing for notes to be held out much longer.
Knee: The Attack dictates how quickly the compressor will act on a signal that exceeds the threshold. Knee dictates how quickly the compression is applied to that signal. A “hard” knee means that as soon as the compressor acts, it fully compresses the signal. This works well when using the compressor as a volume limiter. A “soft” knee will gradually build to using full compression. This keeps vocals sounding natural despite using compression.
Output: This is the output level, which can be modified. After compressing a track or signal, it can be brought back up to its full volume or cut to a lower one.
Different instruments sound more “natural” with specific settings, of course. Do some research online and use your ear to experiment until you find the sound you want. You have to ask yourself “What does my track need?” Now that you know how dynamic range compression works, you can tinker with the sound for yourself.
If you’re looking for more info, there’s a great post on the Seven Strings guitar forum on DRC.
This article was originally written on 04/5/11

Source:  http://www.howtogeek.com/57903/htg-explains-how-does-dynamic-range-compression-work/